I wanted to show some of the fun and useful non-Icon based Alerts.
Art Pack: https://mega.nz/#!d4dmHaJZ
Decryption Key: !lUU6zknEYJoMAFQFMo_ZFoJmHfjqKmpQOeoTLgqyakU
WTF Folder: https://mega.nz/#!dxkQAQaC
Decryption Key: !_LSucpCu-acC8QhM6O1y6Tps3E68pyPfQtt0sgec9PY
Art: KGPanels and Weak Auras
- Unit Frames: Stuf UI
- Raid Frames: Vuh Do
- Cast Bar: Azure Cast Bar
- Minimap: Sexy Map
- Buffs and Debuffs: Raven and Weak Auras
- Buttons: Bartender 4 and Masque
- Eclipse Bar: Balance Power Tracker
- Chat: Prat with Nibs Chat Tabs
- Performance Tracker: Skada
- Tool Tip: TipTac
- Name Plates: KUI Name Plates
- Loot: XLoot
- Miscellaneous Data: SL Data Text
Weak Auras
Player Frame Weak Aura
Components of the Player Frame handled through Weak Auras.
Target Frame Weak Aura
Components of the Target Frame handled through Weak Auras.
Boss Frames Weak Aura
Handles Boss Frames.
Display Weak Aura:
Creates some basic Components of the Interface.
Druid Class Weak Auras
Stores some non-spec specific weak auras like combo points, shapeshifting and shared cooldowns.
Resto Druid Weak Auras
Spec specific Weak Auras.
Balance Druid Weak Auras
Spec specific Weak Aura
HFC Ring
Legendary Ring Weak Aura for all Ring Types.
Healing Cooldowns
Shows what Raid Healing Cooldown is currently Triggered (including Revival.)
KGpanels:
Enter /kgpanels config into your chat box to open your KGPanels menu. Before you Begin doing anything in KGpanels, you must do 2 things first.1)Create a Layout
Layouts are KGPanels weird second version of Profiles. I recommend creating a Layout called "Spec1" and "Spec2," (Feel free to name these anything else.) These can be created under the "Layouts" Menu.
Then under Profiles create a profile called "Spec1" and "Spec2." and enable the check box called Enable dual profile.
Now go to Layouts and Select Spec1 or Spec 2 and press Activate. Then change your dual spec into your other class specialization. Go to Layouts and activate the other specialization.
Now your KGpanels will change when you respec!
2)Import your Art
Art imported into WoW must: (ignore stepped labeled [making art] if you are not... making art.)
- be inside the WoW Folder before you launched the game.
- must be in .Targa format (Photoshop is useful for this)
- [Making Art]must be 2n (ie: 64, 128, 256, 512, ect...) pixels in length and height. ie: 64 x 512, 256 x 1024, 512 x 128, ect...
- [Making Art]must have an Alpha-Mask channel (For non-square images. Press Cntr-6 in photoshop when opening one of my .Targa files to see an example of how the Alpha-Mask works.
If your image comes out as a green square, one of these rules was not followed, this is not something you need to worry about in my Art Pack.
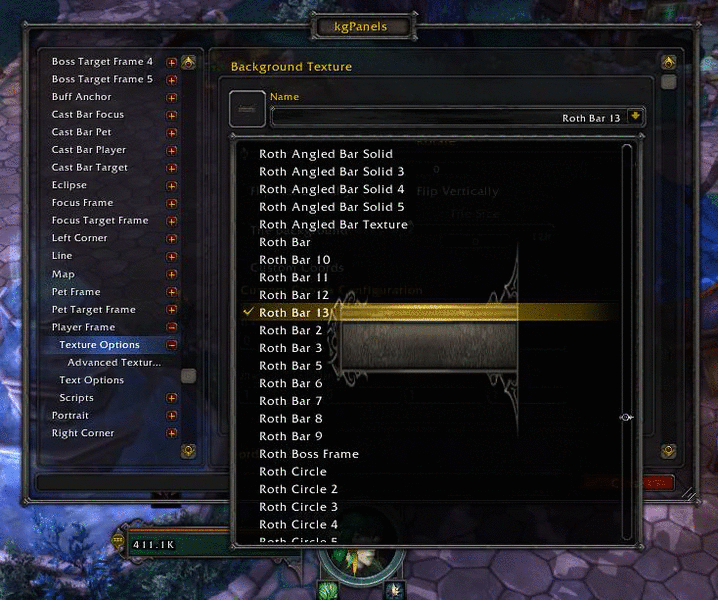
Once your image has followed the above requirements, select Art Library in KGpanels.
- Under Artwork Name: You can enter the nick-name for the image. It does not have to match.
- Under Artwork Path the Folder Path must be entered here.
- This path must begin at the Interface Folder.
- ie: Interface\addons\Custom\Roth\Rothcastbar13.tga
I heavily recommend doing this for all pieces of Art you have. It is a super useful library that can be reused later (with Weak Auras.)
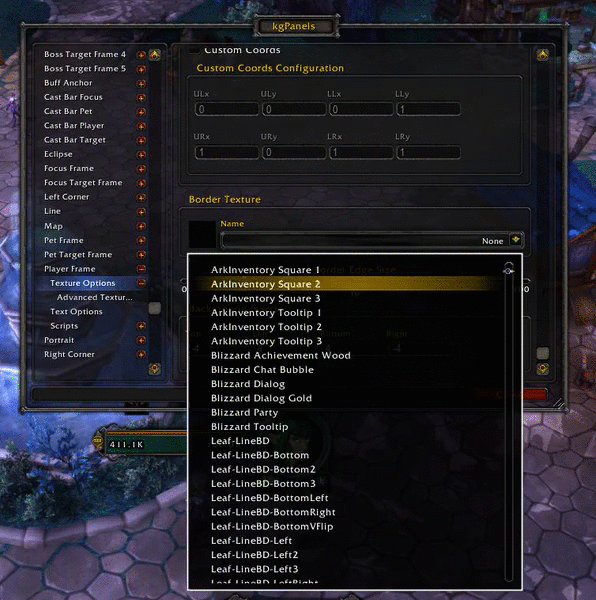
On a final note about Importing Art: Importing Borders is very different from Importing Backgrounds. My art pack does not contain any borders. I will not be going over border imports here.
Creating a Panel
Once your Art is imported into the KGpanels Library. You're ready to attach it to pieces of your Interface.
Select Active Panels enter the name of a panel (such as: Player Frame, Target Frame, Minimap, ect...)
Select your newly created frame. Expand it and Select Texture Options.
Here you can select which image you want to project onto this panel. After your intended image is selected, scroll down and set the Border Texture to "none."
Now go back to the Menu for the panel you created and Follow these Settings. Your Panel should now look like the image you want it to.
Anchoring and Parenting a Panel
Now comes the hard part. It's not enough to just create a panel. For example: If you want to add a background to your Target frame, it would stick around if you have nothing Targeted and your Target Frame is hidden. Anchoring and Parent Fixes this problem.
For Future Reference: (Click for example gif)
Anchoring means your Panel will stick to some part of your interface:


But before you can do either of these, you must know the name of the frame you are attempt to latch you panel onto.
The name of the frame must be entered here on the Panel's Menu.

For this we use our good friend /framestack (/fstack)
/Framestack
This part gets kinda annoying. Everything you see on your Interface exists on a frame. The Universal Frame is UIParent, so if you want your Panel to exist at all times, it must be Parented to "UIParent."
Once frame stack is active, the name of every frame you are mousing over will display on a tooltip on the Top-Right or Bottom-Left of the screen. Figuring out which frames are permanent like the player frame and which ones are temporary can be difficult. Usually the one with the simplest name is the one you want.
/fstack again to deactivate this mode.
If you are using Stuf UI (my absolute favorite for customizing your UI) here are the name of some Frames.
- Stuf Player Frame: Stuf.units.player
- Stuf Target Frame: Stuf.units.target
- Stuf Target of Target Frame: Stuf.units.targettarget
- Stuf Player Pet: Stuf.units.pet
- Stuf Player Pet Target: Stuf.units.pettarget
- Stuf Focus Frame: Stuf.units.focus
- Stuf Focus Target Frame: Stuf.units.focustarget
- Generic UI Minimap: Minimap
- Stuf Boss Frames: Stuf.units.boss1 (there are 5 frames, boss1-boss5)
- Stuf Boss Target Frames: Stuf.units.boss1target (again 1-5)
- Bartender Bars: BT4Button86 (This is the first button of Bar 8. This is a good way to Anchor Bars.)
Frame Strata
The last important thing you need to know to make your panels work is Frame Strata. This is under the Panel's Menu. (click) Frames sit ontop of each other. Frames with a higher Strata will always show on-top of the other with less Strata. Each Layer of Strata has levels and sublevels. Same rules apply.
- A Frame with Medium Strata will Show over a Frame with Low Strata.
- A Frames with Background Strata and higher *Level than another frame with Background Strata will show over the second frame. Same applies to Sublevel.
Wrapping Up
Play with the other settings of KGpanels. Get acquainted with them. Here are some useful ones:
Opacity Bar makes the whole panel transparent.
Flip Horizontally Checkbox is useful for Mirroring your Target Frame Background with your Player Frame Background.
Post a Comment